利用Python画图,千变万化,各种画图技巧!
2018-07-09 13:31:14来源:博客园 阅读 (4050)


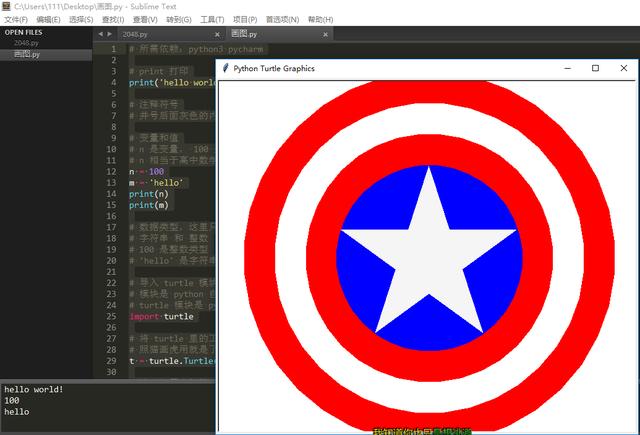
如图所示,利用Python的turtle画了一个美国队长盾牌的标志:
# 所需依赖:python3 sublime
Python代码:
# print 打印
print('hello world!')
# 注释符号
# 井号后面灰色的内容是注释,相当于笔记,会被机器忽略
# 变量和值
# n 是变量, 100 是值,等号的作用是赋值
# n 相当于高中数学的 xyz ,只不过 xyz 的值只能是数字,变量的功能要更强大
n = 100
m = 'hello'
print(n)
print(m)
# 数据类型,这里只讲两个,剩下的需要同学自己去系统地学习了
# 字符串 和 整数
# 100 是整数类型
# 'hello' 是字符串类型
# 导入 turtle 模块
# 模块是 python 自带的工具箱,这里将工具箱导入就能使用了
# turtle 模块是 python 用来画图的工具箱
import turtle
# 将 turtle 里的工具拿出来,赋给 t 变量
# 照猫画虎用就是了,这些东西要到很后面才能理解
t = turtle.Turtle()
# 这一行用来加快画笔速度,从 1~9 依次变快,但 0 是最快
t.speed(0)
# 这是向前走,单位是像素
t.forward(100)
# 这是转弯,单位是角度
t.right(120)
t.forward(100)
t.right(120)
t.forward(100)
t.right(120)
# 复制三次,就画了一个三角形
# 正方形
# 长方形
# 如果我们需要改变三角形的边长怎么办?
# 这就要用到变量了,到时候只需改变变量就能改变长度
# 如果有相同的变量,后面定义的会覆盖前面的
l = 200
t.forward(l)
t.right(120)
t.forward(l)
t.right(120)
t.forward(l)
t.right(120)
# for 循环
# 循环还有 while 循环,考虑到用不着就不讲了
# 循环用来处理重复的事情
# range() 是一个区间
# range(3) 相当于 0 1 2
# range(5) 相当于 0 1 2 3 4
# i 取的是 range() 里的值,一次取一个,取一次就循环一次
# 冒号后面必有缩进,缩进的代表是同一个代码块
# 照着用就行了,注意一个字符都不能敲错,不能用中文符号
for i in range(3):
t.forward(l)
t.right(120)
# 如果想画两个三角形怎么办,再复制一个 for 循环?
# 我们用函数将代码封装起来,到时候直接调用就好了
# def 关键字用来定义函数, triangle 是函数名
# 必须要有冒号接缩进,函数里面也是一个代码块
def triangle():
for i in range(3):
t.forward(l)
t.right(120)
# 函数的调用
# triangle()
# 函数可以传递参数进去
def triangle2(l):
for i in range(3):
t.forward(l)
t.right(120)
# 需要传递个参数进去才能调用这个函数
# triangle2(250)
# 定一个函数画长方形
# 四则运算
# + 加
# - 减
# * 乘
# / 除
# // 整除
# % 取余
# 写一个画 n 边形的通用函数
def polygon(l, n):
angle = 360 / n
for i in range(n):
t.forward(l)
t.right(angle)
# polygon(100, 6)
# 画一个五角星
def five_star(l):
for i in range(5):
t.forward(l)
t.right(144)
# five_star(100)
# 画一个圆
# 边长在 36 以上就是个圆
def circle():
for i in range(36):
t.forward(10)
t.right(15)
# circle()
# 在指定的坐标画图
# 比如要在坐标为 (100, 150) 的位置画个正方形
def square(x, y, l):
t.penup()
t.goto(x, y)
t.pendown()
for i in range(4):
t.forward(l)
t.right(90)
# square(100, 150, 100)
# 将画笔定位封装成函数使用,就能有效去除重复代码
def setpen(x, y):
t.penup()
t.goto(x, y)
t.pendown()
t.setheading(0)
def square(x, y, l):
setpen(x, y)
for i in range(4):
t.forward(l)
t.right(90)
# square(100, 150, 100)
# 画一排正方形,共五个,间隔 10
# 蠢方法
# square(100, 150, 30)
# square(140, 150, 30)
# square(180, 150, 30)
# square(220, 150, 30)
# square(260, 150, 30)
# 使用 for 循环、函数
def square_line(x, y, l, n, dis):
for i in range(n):
inner_x = x + (l + dis) * i
square(inner_x, y, l)
# square_line(100, 150, 30, 6, 10)
# 画一个正方形方阵
def square_matrix(x, y, l, n, dis, m):
for i in range(m):
inner_y = y - (l + dis) * i
square_line(x, inner_y, l, n, dis)
# square_matrix(100, 150, 30, 5, 10, 6)
# 填充颜色,给图形上色
def five_star(l):
t.fillcolor('yello')
t.begin_fill()
for i in range(5):
t.forward(l)
t.right(144)
t.end_fill()
# five_star(100)
# 字典的简单用法
# 抽象画
# for i in range(500):
# t.forward(i)
# t.left(90)
# for i in range(500):
# t.forward(i)
# t.left(91)
colors = ['red', 'yellow', 'blue', 'green']
# for i in range(500):
# t.pencolor(colors[i % 4])
# t.circle(i)
# t.left(91)
# sides = 5
# colors = ['red', 'yellow', 'blue', 'orange', 'green', 'purple']
# for i in range(360):
# t.pencolor(colors[i % sides])
# t.forward(i * 3 / sides + i)
# t.left(360 / sides + 1)
# t.width(i * sides / 200)
# 美队盾牌
def circle(x, y, r, color):
n = 36
angle = 360 / n
pi = 3.1415926
c = 2 * pi * r
l = c / n
start_x = x - l / 2
start_y = y + r
setpen(start_x, start_y)
t.pencolor(color)
t.fillcolor(color)
t.begin_fill()
for i in range(n):
t.forward(l)
t.right(angle)
t.end_fill()
def five_star(l):
setpen(0, 0)
t.setheading(162)
t.forward(150)
t.setheading(0)
t.fillcolor('WhiteSmoke')
t.begin_fill()
t.hideturtle()
t.penup()
for i in range(5):
t.forward(l)
t.right(144)
t.end_fill()
def sheild():
circle(0, 0, 300, 'red')
circle(0, 0, 250, 'white')
circle(0, 0, 200, 'red')
circle(0, 0, 150, 'blue')
five_star(284)
sheild()
# 结尾这一行必须有,照着用就行了
turtle.done()
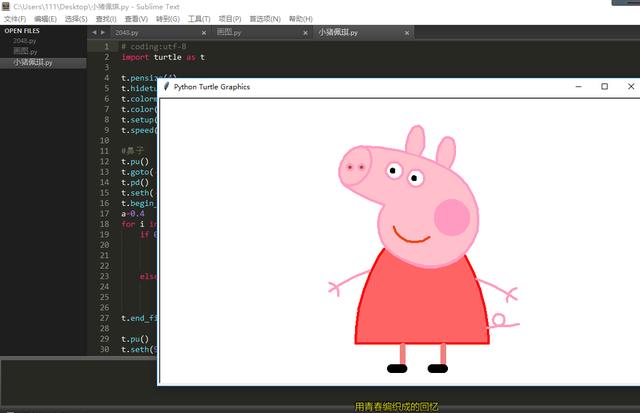
利用Python的turtle画小猪佩奇

Python代码:

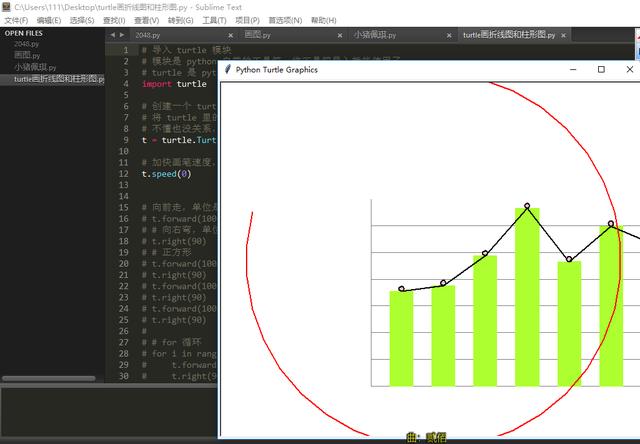
利用Python画折线图与柱形图
# 导入 turtle 模块
# 模块是 python 自带的工具箱,将工具箱导入就能使用了
# turtle 是 python 用来画图的工具箱

代码:
import turtle
# 创建一个 turtle 实例
# 将 turtle 里的工具拿出来,赋给 t 变量
# 不懂也没关系,照猫画虎用就是了
t = turtle.Turtle()
# 加快画笔速度,从 1~9 依次变快,但 0 是最快
t.speed(0)
# 向前走,单位是像素
# t.forward(100)
# # 向右弯,单位是角度
# t.right(90)
# # 正方形
# t.forward(100)
# t.right(90)
# t.forward(100)
# t.right(90)
# t.forward(100)
# t.right(90)
#
# # for 循环
# for i in range(4):
# t.forward(100)
# t.right(90)
#
# # 长方形
# for i in range(2):
# t.forward(150)
# t.right(90)
# t.forward(100)
# t.right(90)
#
# # 给图形上色
# # 跳到指定位置画图
#
# # 将画笔抬起,画笔不会再画出线条
# t.penup()
# # 跳到指定坐标上去
# t.goto(100, 100)
# # 将画笔放下,画笔又能继续画出线条
# t.pendown()
# # 改变画笔箭头朝向,默认水平向右,也就是 0
# t.setheading(0)
# # 设置画笔颜色
# t.pencolor('pink')
# # 设置填充颜色
# t.fillcolor('pink')
# # 隐藏画笔箭头
# t.hideturtle()
# # 开始填充
# t.begin_fill()
# for i in range(2):
# t.forward(150)
# t.right(90)
# t.forward(100)
# t.right(90)
# # 结束填充
# t.end_fill()
# 全部封装成函数
def setcolor(color):
t.pencolor(color)
t.fillcolor(color)
t.hideturtle()
def setpen(x, y):
t.penup()
t.goto(x, y)
t.pendown()
t.setheading(0)
def rect(x, y, w, h, color):
setpen(x, y)
setcolor(color)
# 左下角为起点
t.setheading(90)
t.begin_fill()
for i in range(2):
t.forward(h)
t.right(90)
t.forward(w)
t.right(90)
t.end_fill()
# 里面是一周的天气温度
temps = [16, 17, 22, 30, 21, 27, 24]
# 绘制天气温度折线图
def line_chart(x, y, color, temps, pixel, space):
setcolor(color)
setpen(x, y)
for i, j in enumerate(temps):
# 求出每个点的坐标,直接 goto
x1 = x + (i + 1) * space
y1 = y + j * pixel
dot(x1, y1)
def dot(x, y):
t.pencolor('black')
t.pensize(2)
t.goto(x, y)
t.begin_fill()
t.circle(4)
t.end_fill()
# line_chart(0, 0, 'pink', temps, 10, 50)
# 绘制天气温度柱形图
def bar_chart(x, y, color, temps, w=500, h=300, space=30):
axises_wh(x, y, w, h)
bg_ruler(x, y, w, h)
n = len(temps)
m = max(temps)
width = (w - (n + 1) * space) / n
pixel = h * 0.95 / m
for i, j in enumerate(temps):
height = j * pixel
x1 = x + space + (width + space) * i
# css颜色代码对照表
# if j > 30:
# color = '#FF2D2D'
# elif 25 < j < 31:
# color = '#FF8000'
# elif 20 < j < 26:
# color = '#FFD306'
# else:
# color = '#8080C0'
rect(x1, y, width, height, color)
color = 'pink'
s = space + width
offset = space + width / 2
line_chart(x, y, color, temps, pixel, s, offset)
def axises_wh(x, y, w, h):
setpen(x, y)
setcolor('grey')
t.goto(x + w, y)
setpen(x, y)
t.goto(x, y + h)
setpen(x, y)
def bg_ruler(x, y, w, h):
setpen(x, y)
setcolor('grey')
h = h / 7
for i in range(6):
y1 = y + h * (i + 1)
setpen(x, y1)
t.forward(w)
def line_chart(x, y, color, temps, pixel, space, offset):
setcolor(color)
x = x + offset
y1 = y + temps[0] * pixel
setpen(x, y1)
dot(x, y1)
for i, j in enumerate(temps[1:]):
# 求出每个点的坐标,直接 goto
x1 = x + (i + 1) * space
y1 = y + j * pixel
dot(x1, y1)
bar_chart(-100, -200, 'GreenYellow', temps)
# 选讲
# 一些好玩的图形
def fun():
for i in range(500):
t.forward(i)
t.left(90)
def fun2():
for i in range(500):
t.forward(i)
t.left(91)
def fun3():
colors = ['red', 'yellow', 'blue', 'green']
for i in range(500):
# 可以指定画笔的颜色
t.pencolor(colors[i % 4])
# turtle 自带的画圆函数
t.circle(i)
t.left(91)
# 难以解释
def fun4():
sides = 5
colors = ['red', 'yellow', 'blue', 'orange', 'green', 'purple']
for i in range(360):
t.pencolor(colors[i % sides])
t.forward(i * 3 / sides + i)
t.left(360 / sides + 1)
t.width(i * sides / 200)
# 美队盾牌
# 画一个五角星,并填充颜色
def five_star(l, color):
setcolor(color)
t.begin_fill()
for i in range(5):
t.forward(l)
t.right(144)
t.end_fill()
# 画四个同心圆
def polygon(l, n):
angle = 360 / n
for i in range(n):
t.forward(l)
t.right(angle)
def circle(l, color):
setcolor(color)
t.begin_fill()
polygon(l, 36)
t.end_fill()
def conc_circle(x, y, r, color):
# 通过周长求出边
pi = 3.1415926
c = 2 * pi * r
l = c / 36
start_x = x - l / 2
start_y = y + r
setpen(start_x, start_y)
circle(l, color)
# 画中间的五角星
def center_star(x, y, l):
setpen(x, y)
t.setheading(162)
t.forward(150)
t.setheading(0)
five_star(l, 'white')
def sheild():
conc_circle(0, 0, 300, 'red')
conc_circle(0, 0, 250, 'white')
conc_circle(0, 0, 200, 'red')
conc_circle(0, 0, 150, 'blue')
center_star(0, 0, 284)
sheild()
turtle.done()
标签:
版权申明:本站文章部分自网络,如有侵权,请联系:west999com@outlook.com
特别注意:本站所有转载文章言论不代表本站观点,本站所提供的摄影照片,插画,设计作品,如需使用,请与原作者联系,版权归原作者所有
- python3基础之“术语表(2)” 2019-08-13
- python3 之 字符串编码小结(Unicode、utf-8、gbk、gb2312等 2019-08-13
- Python3安装impala 2019-08-13
- 小白如何入门 Python 爬虫? 2019-08-13
- python_字符串方法 2019-08-13
IDC资讯: 主机资讯 注册资讯 托管资讯 vps资讯 网站建设
网站运营: 建站经验 策划盈利 搜索优化 网站推广 免费资源
网络编程: Asp.Net编程 Asp编程 Php编程 Xml编程 Access Mssql Mysql 其它
服务器技术: Web服务器 Ftp服务器 Mail服务器 Dns服务器 安全防护
软件技巧: 其它软件 Word Excel Powerpoint Ghost Vista QQ空间 QQ FlashGet 迅雷
网页制作: FrontPages Dreamweaver Javascript css photoshop fireworks Flash
