springboot自动配置原理
2019-08-29 09:08:07来源:博客园 阅读 ()

springboot自动配置原理
从main函数说起
? ? ?一切的开始要从SpringbootApplication注解说起。
@SpringBootApplication
public class MyBootApplication {
    public static void main(String[] args) {
        SpringApplication.run(MyBootApplication.class);
    }
}


@SpringBootConfiguration
@EnableAutoConfiguration
@ComponentScan
public @interface SpringBootApplication {

}
? ? ? ?其中最重要的就是EnableAutoConfiguration注解,开启自动配置。
@Target({ElementType.TYPE})
@Retention(RetentionPolicy.RUNTIME)
@Documented
@Inherited
@AutoConfigurationPackage
@Import({AutoConfigurationImportSelector.class})
public @interface EnableAutoConfiguration {
    String ENABLED_OVERRIDE_PROPERTY = "spring.boot.enableautoconfiguration";
    Class<?>[] exclude() default {};
    String[] excludeName() default {};
}
? ? ? ?通过Import注解导入AutoConfigurationImportSelector。在这个类中加载/META-INF/spring.factories文件的信息,然后筛选出以EnableAutoConfiguration为key的数据,加载到IOC容器中,实现自动配置功能。
@Target(ElementType.TYPE)
@Retention(RetentionPolicy.RUNTIME)
@Documented
@Inherited
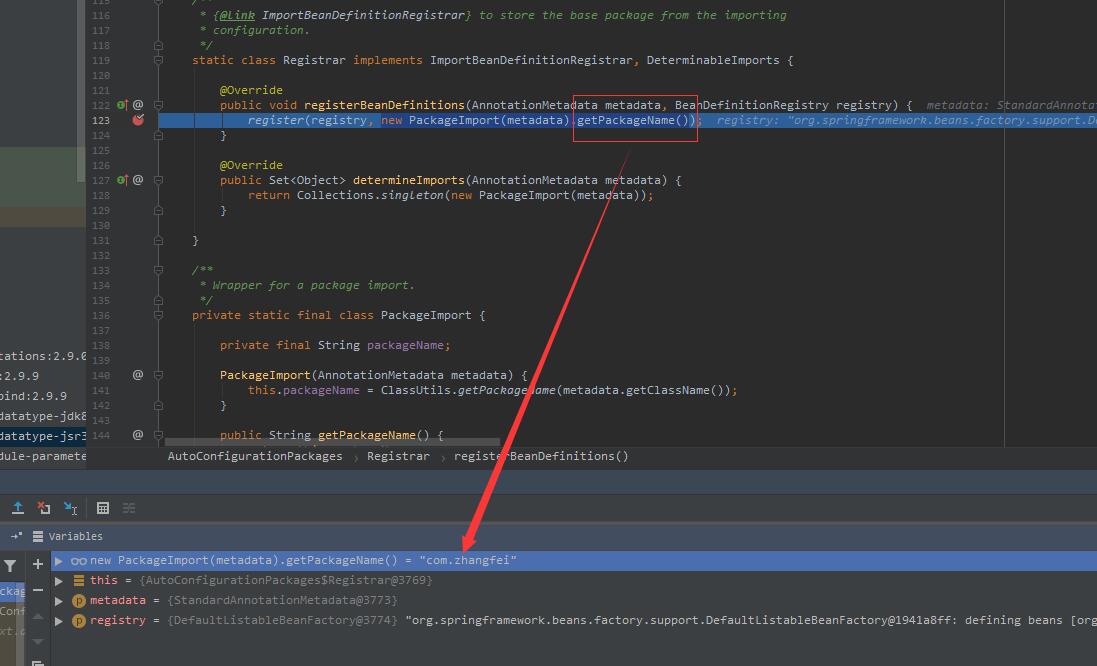
@Import(AutoConfigurationPackages.Registrar.class)
public @interface AutoConfigurationPackage {

}
? ? ? ?从表面看就是自动配置包,主要使用了Import注解,导入了Registrar类。这里Registrar类的registerBeanDefinitions方法导包,也就是导入当前main函数所在路径的包地址,我这里是com.zhangfei。

怎么自动装配其他N个类
Import({AutoConfigurationImportSelector.class})该注解给当前配置类导入另外N个自动配置类。
这里既然导入N个自动配置类,那么都导入哪些类呢?
//AutoConfigurationImportSelector实现DeferredImportSelector接口,而DeferredImportSelector接口又继承了ImportSelector
public interface ImportSelector {
    String[] selectImports(AnnotationMetadata var1);
}
AutoConfigurationImportSelector通过实现接口ImportSelector的selectImports方法返回需要导入的组件,selectImports方法返回一个全类名字符串数组。
主角上场
//AutoConfigurationImportSelector.java
@Override
public String[] selectImports(AnnotationMetadata annotationMetadata) {
    if (!isEnabled(annotationMetadata)) {
        return NO_IMPORTS;
    }
    AutoConfigurationMetadata autoConfigurationMetadata = AutoConfigurationMetadataLoader.loadMetadata(this.beanClassLoader);
    AutoConfigurationEntry autoConfigurationEntry = getAutoConfigurationEntry(autoConfigurationMetadata,annotationMetadata);
    return StringUtils.toStringArray(autoConfigurationEntry.getConfigurations());
}

protected AutoConfigurationEntry getAutoConfigurationEntry(AutoConfigurationMetadata autoConfigurationMetadata,AnnotationMetadata annotationMetadata) {
    if (!isEnabled(annotationMetadata)) {
        return EMPTY_ENTRY;
    }
    AnnotationAttributes attributes = getAttributes(annotationMetadata);
    List<String> configurations = getCandidateConfigurations(annotationMetadata, attributes);
    configurations = removeDuplicates(configurations);
    Set<String> exclusions = getExclusions(annotationMetadata, attributes);
    checkExcludedClasses(configurations, exclusions);
    configurations.removeAll(exclusions);
    configurations = filter(configurations, autoConfigurationMetadata);
    fireAutoConfigurationImportEvents(configurations, exclusions);
    return new AutoConfigurationEntry(configurations, exclusions);
}

protected List<String> getCandidateConfigurations(AnnotationMetadata metadata, AnnotationAttributes attributes) {
    List<String> configurations = SpringFactoriesLoader.loadFactoryNames(getSpringFactoriesLoaderFactoryClass(),getBeanClassLoader());
    return configurations;
}
这里又开始调用SpringFactoriesLoader.loadFactoryNames。
SpringFactoriesLoader.loadFactoryNames方法中关键的三步:
(1)从当前项目的类路径中获取所有 META-INF/spring.factories 这个文件下的信息.
(2)将上面获取到的信息封装成一个 Map 返回,EnableAutoConfiguration为key。
(3)从返回的Map中通过刚才传入的 EnableAutoConfiguration.class参数,获取该 key 下的所有值。
public static List<String> loadFactoryNames(Class<?> factoryClass, @Nullable ClassLoader classLoader) {
    String factoryClassName = factoryClass.getName();
    return (List)loadSpringFactories(classLoader).getOrDefault(factoryClassName, Collections.emptyList());
}

private static Map<String, List<String>> loadSpringFactories(@Nullable ClassLoader classLoader) {
    MultiValueMap<String, String> result = (MultiValueMap)cache.get(classLoader);
    if (result != null) {
        return result;
    } else {
        try {
            Enumeration<URL> urls = classLoader != null ? classLoader.getResources("META-INF/spring.factories") : ClassLoader.getSystemResources("META-INF/spring.factories");
            LinkedMultiValueMap result = new LinkedMultiValueMap();

            while(urls.hasMoreElements()) {
                URL url = (URL)urls.nextElement();
                UrlResource resource = new UrlResource(url);
                Properties properties = PropertiesLoaderUtils.loadProperties(resource);
                Iterator var6 = properties.entrySet().iterator();

                while(var6.hasNext()) {
                    Entry<?, ?> entry = (Entry)var6.next();
                    String factoryClassName = ((String)entry.getKey()).trim();
                    String[] var9 = StringUtils.commaDelimitedListToStringArray((String)entry.getValue());
                    int var10 = var9.length;

                    for(int var11 = 0; var11 < var10; ++var11) {
                        String factoryName = var9[var11];
                        result.add(factoryClassName, factoryName.trim());
                    }
                }
            }

            cache.put(classLoader, result);
            return result;
        } catch (IOException var13) {
            throw new IllegalArgumentException("Unable to load factories from location [META-INF/spring.factories]", var13);
        }
    }
}
自动配置都有哪些内容呢?
# Auto Configure
org.springframework.boot.autoconfigure.EnableAutoConfiguration=\
org.springframework.boot.autoconfigure.admin.SpringApplicationAdminJmxAutoConfiguration,\
org.springframework.boot.autoconfigure.aop.AopAutoConfiguration,\
org.springframework.boot.autoconfigure.amqp.RabbitAutoConfiguration,\
org.springframework.boot.autoconfigure.batch.BatchAutoConfiguration,\
org.springframework.boot.autoconfigure.cache.CacheAutoConfiguration,\
...其他省略
XXXAutoConfiguration和XXProperties
在spring.factories文件中看到的都是自动配置类,那么自动配置用到的属性值在那里呢?我们拿出redis为例
@Configuration
@ConditionalOnClass(RedisOperations.class) //判断当前项目有没有这个类RedisOperations.class
@EnableConfigurationProperties(RedisProperties.class) //启用配置属性,这里看到了熟悉的XXXProperties
@Import({ LettuceConnectionConfiguration.class, JedisConnectionConfiguration.class }) //导入这两个类
public class RedisAutoConfiguration {

    @Bean
    @ConditionalOnMissingBean(name = "redisTemplate")
    public RedisTemplate<Object, Object> redisTemplate(RedisConnectionFactory redisConnectionFactory)
            throws UnknownHostException {
        RedisTemplate<Object, Object> template = new RedisTemplate<>();
        template.setConnectionFactory(redisConnectionFactory);
        return template;
    }

    @Bean
    @ConditionalOnMissingBean
    public StringRedisTemplate stringRedisTemplate(RedisConnectionFactory redisConnectionFactory)
            throws UnknownHostException {
        StringRedisTemplate template = new StringRedisTemplate();
        template.setConnectionFactory(redisConnectionFactory);
        return template;
    }
}

//这里则保存redis初始化时的属性
@ConfigurationProperties(prefix = "spring.redis")
public class RedisProperties {

    private int database = 0;

    private String url;

    private String host = "localhost";

    private String password;

    private int port = 6379;

    private boolean ssl;

}
原文链接:https://www.cnblogs.com/sword-successful/p/11427875.html
如有疑问请与原作者联系
标签:
版权申明:本站文章部分自网络,如有侵权,请联系:west999com@outlook.com
特别注意:本站所有转载文章言论不代表本站观点,本站所提供的摄影照片,插画,设计作品,如需使用,请与原作者联系,版权归原作者所有
上一篇:Java生产者消费者的三种实现
- springboot2配置JavaMelody与springMVC配置JavaMelody 2020-06-11
- SpringBoot 2.3 整合最新版 ShardingJdbc + Druid + MyBatis 2020-06-11
- 掌握SpringBoot-2.3的容器探针:实战篇 2020-06-11
- nacos~配置中心功能~springboot的支持 2020-06-10
- SpringBoot + Vue + ElementUI 实现后台管理系统模板 -- 后 2020-06-10
IDC资讯: 主机资讯 注册资讯 托管资讯 vps资讯 网站建设
网站运营: 建站经验 策划盈利 搜索优化 网站推广 免费资源
网络编程: Asp.Net编程 Asp编程 Php编程 Xml编程 Access Mssql Mysql 其它
服务器技术: Web服务器 Ftp服务器 Mail服务器 Dns服务器 安全防护
软件技巧: 其它软件 Word Excel Powerpoint Ghost Vista QQ空间 QQ FlashGet 迅雷
网页制作: FrontPages Dreamweaver Javascript css photoshop fireworks Flash
